How to Merge WordPress Categories Without Any Plugin

Doing the blogging since a few years, there was a huge list of categories which was created over time. I never have had time to manage the categories properly and let them grew like mushrooms on wet ground. Just a few days ago I was reading some old articles from my blog and found it annoying having so many categories. I spend a few hours to trim the bushes properly. What I did is explained in: How to Merge Categories in WordPress Without Any Plugin.
I did not use any plugin to merge WordPress categories. Just 4 easy steps and the work was done. You must also know that there were over 280 categories. So, when I was trimming down the categories, I created tags for the same categories, which may be a mistake. I will know it in future. Let’s see. Below is a pictorial for you where you can learn How to Merge WordPress Categories Without Any Plugin. Trimming categories has two parts: I merged the categories and then deleted the unwanted ones.
Step 1: How many posts we need to eliminate
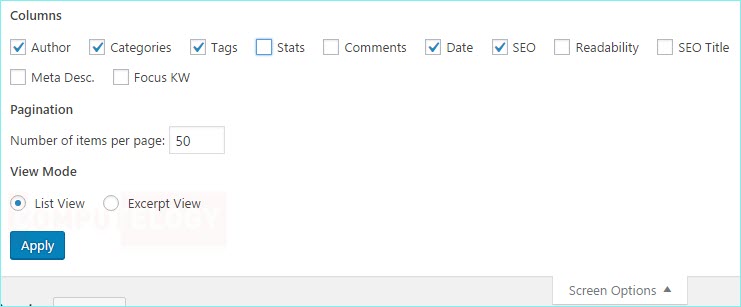
This step is only important if you have hundred or more posts showing in the All Posts dashboard in your admin panel. Go to Posts >> All Posts. On the right upper corner you will see Screen Options button. Click on it and a panel will show up. Select how many posts, which you are going to edit, should show at one time. I have 50 which is OK for me. Also check Categories box because we are gonna need it later.
Step 2: Selection of posts going to be eliminated
Now you need to select the posts which needed to be removed from or assigned to other categories. You can do two different ways.
You go to Posts >> Categories and click on the number of posts at the end of the category name which you want to edit. All the posts of that category will show up.

You can also select the category from the All Posts admin panel and Press the button Filter. All the posts of that category will show up.

Step 3: Apply new category and remove old category
Now select all posts or any number of posts which you want to edit. Select Edit from the dropdown menu and press Apply. You will see a panel like shown below. By default, no category will be selected in Categories panel. You select the one or more categories you want to apply. Finally press Update button.
I will explain the image in bit details. The following images tells that I selected AntiLogger category and pressed button Filter. After a while, all the posts with AntiLogger category showed up. Then I selected new category Security from category list. I wanted to apply this Security category to apply to the all posts instead of a few. You can give tags here to the all select posts if you want.

OK. Now your posts are updated with the categories of your selection.
Step 4: Deleting undesired category
You may need to eliminate the undesired categories. Just go to Posts >> Categories and delete the categories which you don’t wish anymore. You can see the first image in Step 2 to follow.

You did merging categories in the previous steps. But by merging and deleting categories may have bad effects on your SEO. To keep the maximum SEO, use Redirection plugin. Also, update and submit your sitemap to search engines like Google, Yandex, Yahoo, Bing, etc.
